
In the following tutorial, I will show you how I have modeled a new packaging concept for Doritos inside 3DS Max. You can see the whole concept and read more about it at my Behance profile.
However, I will offer you more than just a regular tutorial in this post. I will also talk and present ways how to use 3D software as a tool for generating and exploring new ideas.
Step 1
Since the base of the packaging is a hexagon, the best way to start is by creating a cylinder with only 6 sides.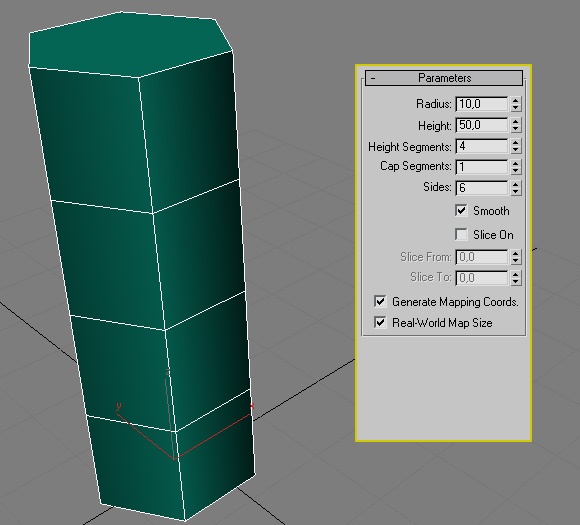 If you try to render it now, even though there are only 6 sides, the edges will still look soft which is something we don’t need. In order to sort this out, turn off the “Smooth” option.
Step 2
Now it’s time to start editing the primitive. In order to work non-destructively, instead of converting the cylinder to Editable Poly, we will add a modifier.Go to the Modifier tab and from the Modifier List, pick Edit Poly (notice that after this action the soft edges will appear again in the viewport).

Pick the Polygon Selection Mode [4] and select all faces [Ctrl+A]. Then scroll down to the bottom of the Modify Tab, and under Polygon: Smooting Groups, click the Clear All button. The edges will become sharp again.

Step 3
Now since we have the base, it’s time to work on the triangular sides.Switch to Vertex Selection Mode [1] and select the middle vertices. The easiest way to do this is to go to the front viewport and drag a selection around the middle row.

Now we need to rotate those vertices by 30° (doesn’t matter whether it’s clockwise or counter-clockwise)

Few edges need to be added in order to divide the shape on triangles. For that purpose we will use the Cut tool (Modify tab > Edit Geometry > Cut, or use the shortcut Alt+C). After we active this tool, a crossbar will appear which we can use to draw the missing edges by clicking over the vertices that need to be connected.

After that, right mouse click to exit the Cut Tool and activate it again by using the shortcut Alt+C in order to draw another edge.

Step 4
When you’re done, check your model for extra vertices. Sometimes when you’re using the Cut Tool, it happens to click near a vertex instead of over it, which creates additional points that we don’t need, so we have to fix this.If there are no obsolete vertices in your model, feel free to skip this step.

Make sure you’re still in Vertex Selection Mode, and under Edit Vertices, choose Target Weld.
First, click over the additional vertex, and then over the original one. This will automatically weld them together, without affecting the position of the original vertex.


Step 5
Now we will work on the proportions of this packaging until we come to a satisfying result.1. Exit out of the Vertex Selection mode by clicking over the yellow icon.
2. Take the Select and Non-Uniform Scale tool [R] (notice that you might need to click the shortcut a few times in order to pick the proper Scale Tool, or if you’re using your mouse, click and hold over the Scale icon until you can see all tools available underneath it).

In the Perspective Viewport, drag the Z axis until you get to 80.

Now the triangular sides look better since their sides are equilateral. However the top and the bottom part of the packaging look pretty big. Let’s narrow them down.
Go to Vertex Selection Mode [1] again. In the Front Viewport select the top and bottom row of vertices. Take the Scale Tool [R] and in the Front Viewport and drag the Y Axis until you get to 85.

